
Blazor Basics: Dealing with Complex State Scenarios in Blazor

Learn about different ways to manage complex state in Blazor web applications, including by fetching data in the OnInitialized lifecycle method and by handling global state with a library like Fluxor.
In this article, we will learn about different ways to manage complex state in Blazor web applications.
In the Component Parameters and State Management article of the Blazor Basics series, we learned about the fundamentals of Blazor state handling.
This article builds on that foundation and explains more advanced concepts for state management in Blazor web applications.
You can access the code used in this example on GitHub.
What Is State in Web Applications?
Originally, the web was created as a stateless system where websites show information on the screen.
Whenever the user interacts with the website, for example, by clicking on a link, the website fetches another HTML document from the server, and the browser renders it on the screen.
Today, we build complex and scalable web applications. Often, users log into their applications and manipulate data. This requires loading data into the application and keeping track of user actions.
In modern web development, state refers to the data an application manages over time during a user’s session.
State Handling in Blazor
In Blazor, there are many different options for storing and handling the state of a web application.
There are two main categories: client-side and server-side state management.
Client-side state management:
- Cookies: We can store a limited size of data in cookies. The advantage is that cookies are automatically sent to the server with every request. This also is their biggest downside. If they grow in size, it can notably slow the system down. There are also security risks in using cookies to store confidential information.
- Browser storage (local and session storage): Modern browsers expose APIs to store data on the client. Data stored in the session’s storage is gone after the user closes the browser or exits the tab. Data stored in the local storage remains on the client and can be loaded when the user visits the web application next time.
- URL parameters: URL parameters allow us to provide state information. For example, we can add the id of a blog post to the URL of the website to specify which article should be loaded and rendered. URL parameters have the most limitations regarding the length and form of data.
- In-memory state: Modern web frameworks, including Blazor, have different mechanisms to handle state in-memory. For example, we can implement a service and inject the instance in a Blazor component to access data from the server and cache it on the client.
Server-side state management:
- Databases: When we want to store data for a longer time than a user’s session or want the data to be available to multiple users, we usually persist data on the server using a database management system such as MSSQL, Postgres, MySQL, MariaDB, MongoDB, etc.
- Caching: Frequently used applications tend to slow down when too many users access the same information from the server over and over again. A common solution is to implement a caching layer between the database and the server. The caching policy defines how long the information is provided from the cache instead of hitting the database.
In the following sections of this article, we will focus on client-side state handling and different options for implementing in-memory state handling in Blazor web applications.
Fetching Data in the OnInitialized Lifecycle Method
Data usually comes from the server. A simple technique is to let every component fetch its data.
The most significant advantage to this is that you will most likely end up with up-to-date information and do not have to pass data using component parameters or cascading values.
The most significant disadvantage is that you will most likely load the same data over and over again.
Let’s say a simple component wants to show the username of the authenticated user:
<div>@Username</div>

@code {
    public string Username { get; set; } = "";
    private IUserService _userService;

    public ShowUsername(IUserService userService)
    {
        _userService = userService;
    }

    protected async override Task OnInitializedAsync()
    {
        var user = await _userService.LoadUser();
        Username = user.Username;
    }
}
Now, let’s imagine that we have another component that allows the user to edit their first and last name.
<h3>Edit User</h3>

<EditForm Model="@UserModel">
    <InputText @bind-Value="UserModel.FirstName" />
    <InputText @bind-Value="UserModel.LastName" />
</EditForm>

@code {
    public User UserModel { get; set; } = new User();
    private IUserService _userService;

    public EditUser(IUserService userService)
    {
        _userService = userService;
    }

    protected async override Task OnInitializedAsync()
    {
        UserModel = await _userService.LoadUser();
    }
}
The IUserService represents a service that directly loads the data from the database. When using Entity Framework Core, it could be a DatabaseContext object, directly injected into the Blazor component (when using Blazor Server), or an API wrapping the Enitity Framework Core code in a Blazor WebAssembly application.
Both components individually hit the server and load the user from the database, even though the username hasn’t changed. In most applications, the username can never be changed.
Therefore, loading the information a single time when the user authenticates is enough.
Hint: Of course, when the information changes, for example, within the component shown above, the state has to be updated or reloaded.
This example perfectly illustrates why it quickly becomes an issue when every component loads data from the server individually.
But what are the alternative solutions?
Using Services to Inject State
Services are a very flexible approach to handle state in any .NET application, including Blazor web applications.
We can abstract a service implementation with an interface definition and use .NET dependency injection to access an instance of the service in our Blazor components.
Depending on the kind of state we want to access, we can either register the service as a singleton, meaning there will be a single instance for all users, or scoped, meaning there will be an instance for every user.
The following C# interface and class definitions demonstrate the implementation of a service that holds state.
public interface IUserService
{
    Task<User> LoadUser();
}

public class UserService : IUserService
{
    public async Task<User> LoadUser()
    {
        // Replace with an actual DB call and cache the result within the service
        // multiple service calls will return the same data, only loaded once.
        return await Task.FromResult<User>(null);
    }
}
The following Blazor component demonstrates how to access the state provided by the service implementation.
<div>@Username</div>

@code {
    public string Username { get; set; } = "";
    private IUserService _userService;

    public ShowUsername(IUserService userService)
    {
        _userService = userService;
    }

    protected async override Task OnInitializedAsync()
    {
        var user = await _userService.LoadUser();
        Username = user.Username;
    }
}
As you can see, the component looks the same as when loading the data directly from the database. The difference is in the implementation and/or caching of the loaded data within the service.
To make it work, we need to register the service in the dependency injection container on application startup.
builder.Services.AddScoped<IUserService, UserService>();
Hint: When using Blazor server interactivity, the framework will make sure that we resolve only one instance of a service per user when registering the service as scoped. When using Blazor WebAssembly interactivity, there will also be a service per user because the service will be instantiated on the client.
Global State Handling (With Fluxor)
Different libraries focus on providing a global state to your Blazor web application.
In this article, we want to focus on Fluxor, an implementation of the Flux architecture, which was made popular by Redux, a Facebook library for React.
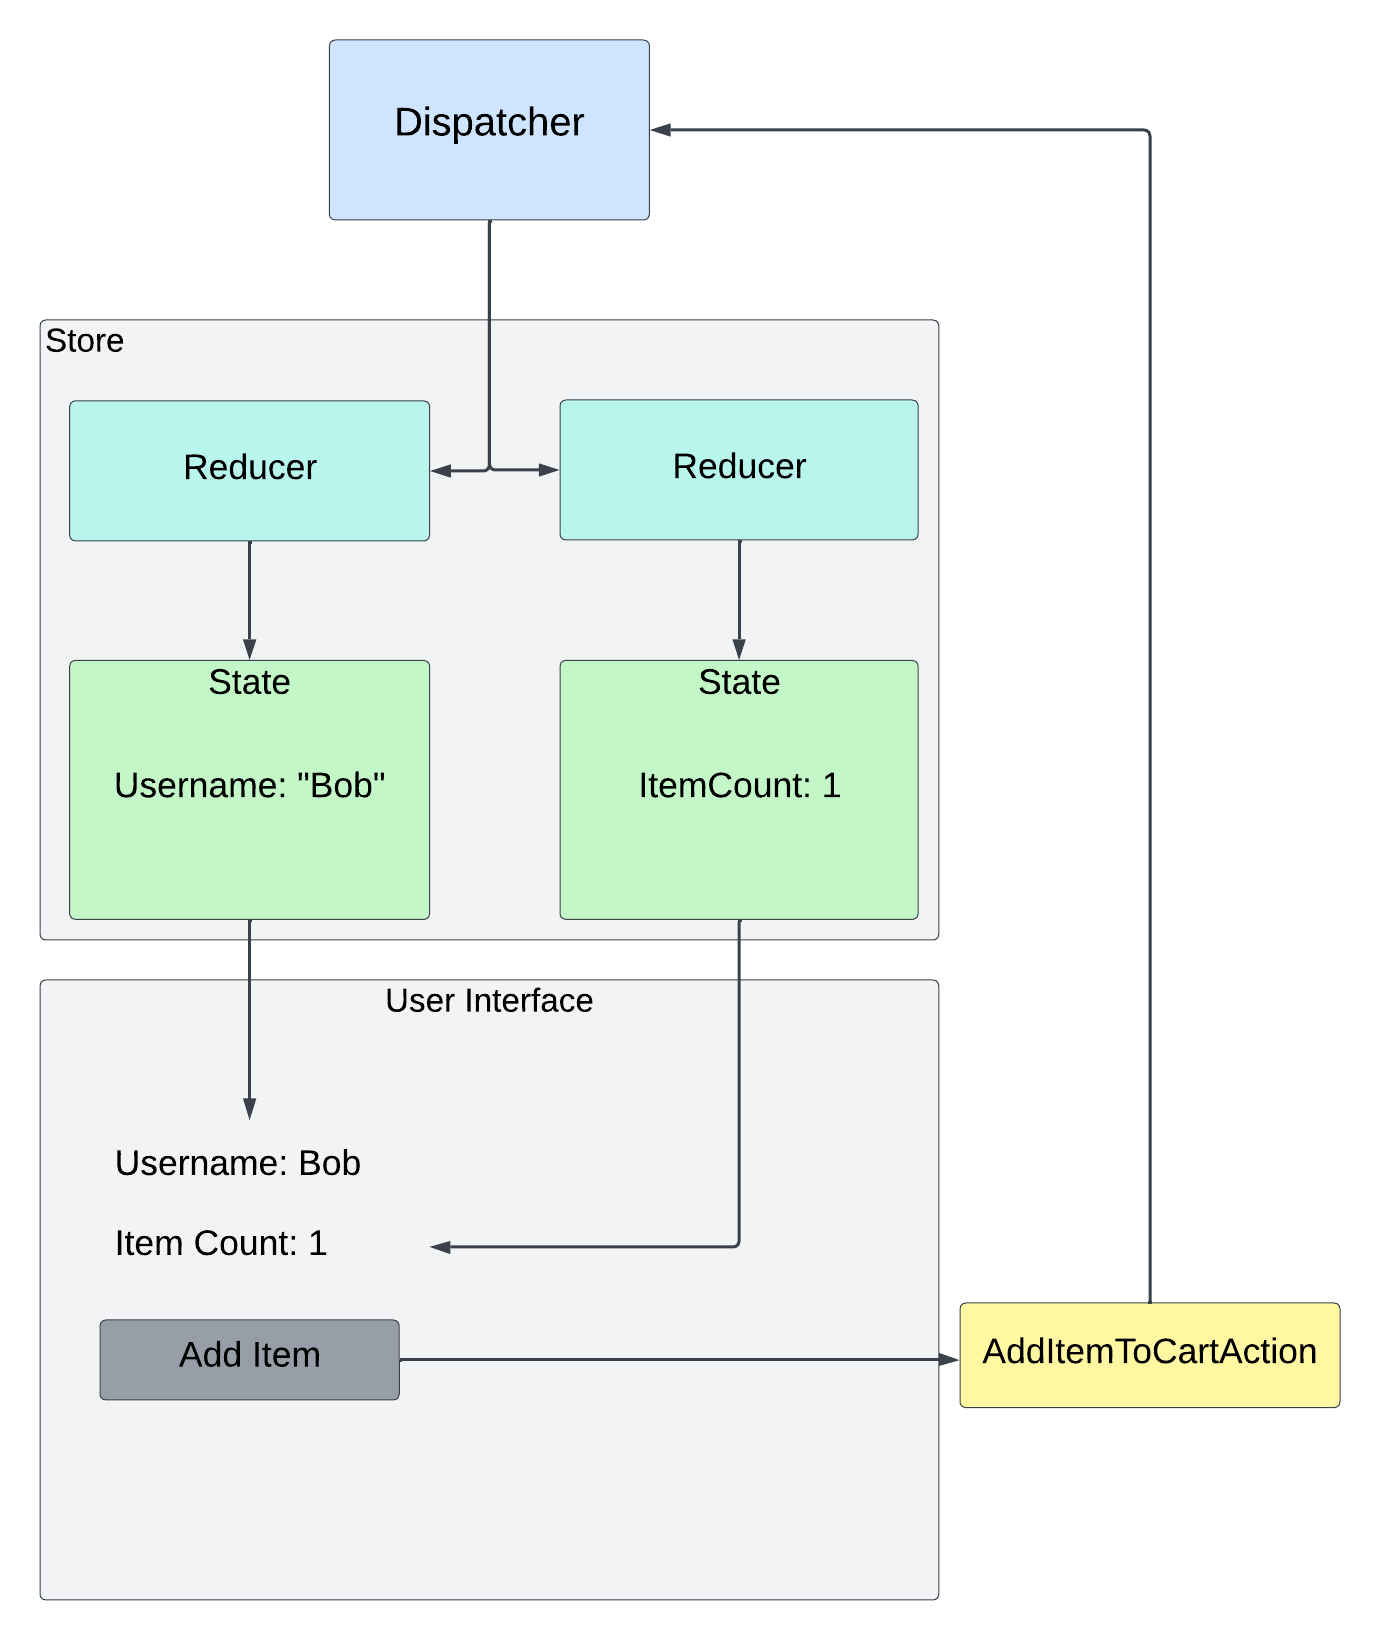
The Flux pattern uses a dispatcher to delegate actions to reducers created by your application.
For example, a button click can trigger an AddToCartAction. The dispatcher provides the action to reducers, which process the action and make state changes.
There are two main rules in the Flux pattern:
- State should always be read-only.
- To change state, we dispatch an action.
We can have one or more reducers handling a specific action. For example, we can have a reducer handling the AddToCartAction by incrementing the ItemCount state by one. Another reducer could add the item added to the cart to a list of items.
A reducer that changes the state will always use the information provided by the action and combine it with the previous state to create the new state.
Warning: The following example runs with a .NET 7 Blazor Server application and is not yet compatible with the new Blazor Web App project template in .NET 8. However, Fluxor is expected to support .NET 8 Blazor apps with version 6.0. Learn more about the .NET 8-related issue on GitHub.
You can access the code used in this example on GitHub.
First, we install the Fluxor.Blazor.Web NuGet package.
In the Program.cs file, we register the Fluxor services and provide an Assembly object to tell Fluxor to inspect the whole assembly for stores, reducers, and other Fluxor-related types.
using Fluxor;
builder.Services.AddFluxor(options => options.ScanAssemblies(typeof(Program).Assembly));
We also need to add a reference to the StoreInitializer component in the App.razor file. I put it before the Router definition.
<Fluxor.Blazor.Web.StoreInitializer />
Next, we create a ShoppingCartState class that holds the application state. In our example, we want to store how many items are in the cart.
using Fluxor;

[FeatureState]
public class ShoppingCartState
{
    public int ItemCount { get; }

    private ShoppingCartState()
    {
    }

    public ShoppingCartState(int itemCount)
    {
        ItemCount = itemCount;
    }
}
Fluxor uses annotations for discovering types. We use the FeatureState attribute on the ShoppingCartState.
Next, we create a AddToCartAction class that we can use to indicate that an items has been added to the cart. In a more complex scenario, we would add information about what product is added to the store, but we want to keep it simple and define the type without additional properties.
public class AddToCartAction
{
}
Now that we have the store object and the action, we need to implement the reducer that applies the changes to the state when an event of type AddToCartAction is received.
We create a Reducer.cs file and define a public static class.
using Fluxor;

public static class Reducers
{
    [ReducerMethod]
    public static ShoppingCartState ReduceAddToCartAction(
        ShoppingCartState state, AddToCartAction action)
    {
        return new ShoppingCartState(state.ItemCount + 1);
    }
}
The first parameter of the static ReduceAddToCartAction method accepts the current state, and the second parameter is an instance of the action that we need to process.
In our example, we do not read any properties from the action object. Instead, we take the current item count from the current state and add 1. Lastly, we create a new state object and return it.
Again, we use a Fluxor-specific annotation by adding the ReducerMethod attribute on the static method to signal to Fluxor that this method can handle Fluxor actions.
Attention: Without this annotation, the method will not be registered and will not be called when an action is triggered.
Now that we have the state object, the action and the reducer in place, we want to use the state in our application. We also want to trigger the action when a user presses a button.
In the Blazor component, we need to add a few using statements and make the component inherit from the FluxorComponent base class. Inheriting from this base class is required to initialize the mechanisms behind receiving state updates.
@using Fluxor
@using Fluxor.Blazor.Web.Components

@inherits FluxorComponent
Next, we inject the previously implemented state object and an instance of the Fluxor-specific IDispatcher type.
@inject IState<ShoppingCartState> ShoppingCartState
@inject IDispatcher Dispatcher
Next, we want to render the item count from the ShoppingCartState object:
<div>Items in cart: @ShoppingCartState.Value.ItemCount</div>
Next, we want to trigger an action when the user presses a button to add an item to the cart.
<button type="button" @onclick="() => AddToCart(product)">Add to cart</button>

public void AddToCart(Product product)
{
    var action = new AddToCartAction();
    Dispatcher.Dispatch(action);
}
We create a new instance of the AddToCartAction class and provide it to the Dispatch method on the Dispatcher object.
This code means that whenever the user presses the button, the dispatcher sends the action to the reducers, who handle the action type.
Hint: The component code shown isn’t complete. Refer to the repository on GitHub for the full example code.
The Magic of Global State Handling
The example shown above needs many different classes to handle a simple scenario.
I agree that for handling a button click and changing the state within the same component, global state handling is an overkill.
However, let’s extend the example to benefit from the advantages of global state handling.
What if we want to show the number of items in the shopping cart in a completely unrelated component? For example, on the NavMenu component so that it is always visible—no matter what page is shown?
In the NavMenu component, we add the following lines:
@using Fluxor
@using Fluxor.Blazor.Web.Components

@inherits FluxorComponent
@inject IState<ShoppingCartState> ShoppingCartState

<div class="nav-item px-3" style="color: white">
    <div>Shopping Cart Items: @ShoppingCartState.Value.ItemCount</div>
</div>
Of course, we need to put the template code within the <nav> definition, but I omitted the other code for simplicity.
Here, we again use the IState interface and provide our state type as its generic argument. It allows us to inject an instance of the state object holding the current state.
Next, we render the item count on the NavMenu component. With those few lines, we solved a relatively complex problem—synchronizing state across unrelated components—with ease.
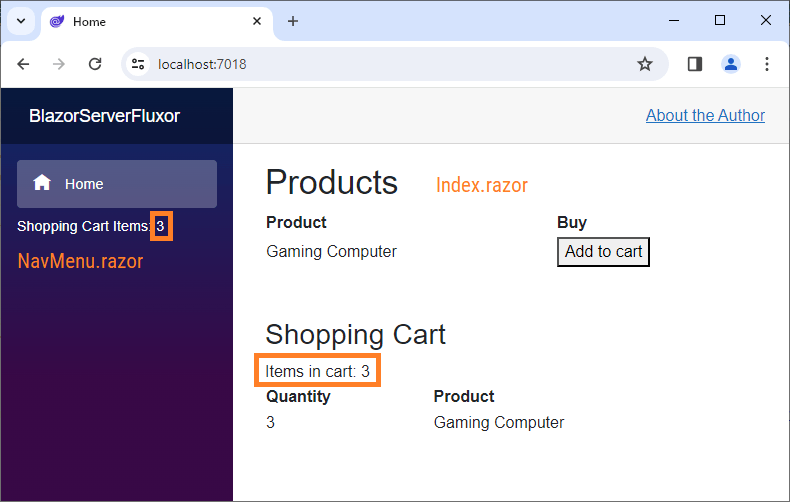
When we run the application in the browser, we can see the number of items within the shopping cart in two different locations. The NavMenu on the left and the Index page on the right show the same state.
Both components are entirely independent and unrelated to each other, yet they show the same state.
Tradeoffs When Working with Global State Handling
The biggest advantage of using global state handling, including Fluxor, for Blazor web applications is that we decouple the application state from UI components.
Implementing features such as showing the number of items in a shopping cart on a completely unrelated component than the component rendering the shopping cart items becomes simpler.
The biggest disadvantages are the added complexity introduced by the Flux pattern and the potential for chaos when the application grows. With a central or global state, every UI component can potentially access whatever state it desires. This makes it harder to maintain the application in the long term.
Conclusion
Managing state effectively in web applications is crucial for providing a great user experience and optimizing performance. However, it can also introduce complexity, especially as applications grow in size.
There is no right or wrong approach to state handling in Blazor applications. There are multiple different options for handling state in Blazor web applications. Always keep the big picture in mind when applying techniques explained in this article.
The steps to use a global state handling library should be taken carefully. Does the application benefit enough from the advantage of a decoupled, global state that you want to introduce the complexity that comes with using, for example, Fluxor?
If you want to learn more about Blazor development, you can watch my free Blazor Crash Course on YouTube. And stay tuned to the Telerik blog for more Blazor Basics.

Claudio Bernasconi
Claudio Bernasconi is a passionate software engineer and content creator writing articles and running a .NET developer YouTube channel. He has more than 10 years of experience as a .NET developer and loves sharing his knowledge about Blazor and other .NET topics with the community.
Related Posts
Comments
All articles
Topics

Latest Stories
in Your Inbox
Subscribe to be the first to get our expert-written articles and tutorials for developers!
All fields are required