
Testing in Angular

Let’s learn about the current state of testing that comes with Angular and explore Karma, Jasmine, TestBed and Web Test Runner.
When we create an application, checking that it meets delivery standards and requirements is crucial. But what about tests? Yes, testing is sometimes considered a lower priority task in our projects.
However, testing is a lifesaver in development because an app is always undergoing changes. Testing helps us avoid breaking our apps when adding new features and to perform refactors without fear.
When we create an application in Angular, by default, it creates a test for our first component. If we create a new component, it always includes a test. But when we add new logic or inject a service, then maybe the old tests are still applicable, or maybe they don’t cover the new lines.
Angular allows us to easily write tests for components, directives, pipes, services and more. It also provides tools to easily mock dependencies to reduce boilerplate.
Today, we’re going to explore the status of Angular testing and learn how to write our first tests.
The Angular Testing Status
When we create a component, service or another Angular entity, the CLI generates a test (.spec) file by default.
The test comes with an example for basic functionality, ensuring the entity works. These tests are written in the Jasmine framework, and Angular relies on Karma to run them.
But what are Karma and Jasmine?
- Karma: This is the test runner; it has the responsibility to execute our tests and show the report.
- Jasmine: This is our framework for writing tests, which helps us effectively write them.
Hold on a second, the Angular team says Karma is deprecated 🤔?
Yes, Karma is deprecated, but it still comes by default in Angular. Since version 16, the Angular team has been working to find the best options for the community, such as Jest and Web Test Runner.
The Angular team doesn’t have an official decision yet, but based on community feedback and the results with Web Test Runner, it looks like it will be added in future versions.
Now that we have a good overview of the status of Angular testing, let’s write tests in Jasmine and also take on the responsibility of replacing Karma. So, let’s create a real-world scenario for you! 😈
Scenario
Let’s say we have been hired to create an app to show a list of products. We must deliver not only the functionality but also include testing.
And one more thing, because Karma is deprecated, migrate from Karma to the Web Test Runner. 😖
Set Up the Project
In your terminal, run the following command to create a new Angular project named kendo-store:
ng new kendo-store

? Which stylesheet format would you like to use? SCSS  [

https://sass-lang.com/documentation/syntax#scss        ]

? Do you want to enable Server-Side Rendering (SSR) and Static Site Generation

(SSG/Prerendering)? No

cd new kendo-store
Now that our Angular project is ready, let’s see the status of our tests.
Green by Default
By default, the CLI generates the app.component.spec.ts, which is our first test for the app.component.ts.

Because an application is more than a single component, let’s create the products service using the CLI by running the following command:
ng g s services/products
CREATE src/app/services/products.service.spec.ts (383 bytes)
CREATE src/app/services/products.service.ts (146 bytes)
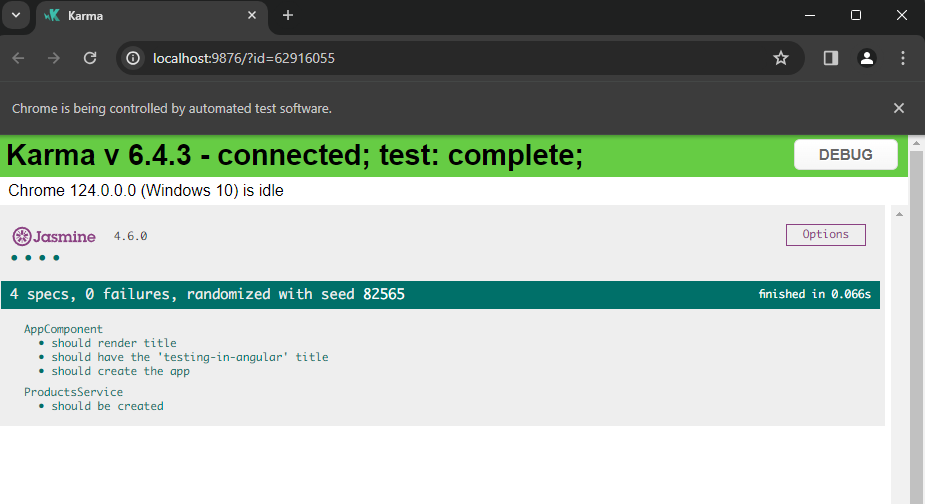
It’s time to run the ng test command to see the status of our tests. Tada!!! Everything is green! for the app.component and products.service. It’s perfect! 🎉
Hey, But Who Creates Those Tests?
The CLI generates test files with a .spec extension for the component and service. It makes it easy for us to have coverage in our application. So now we have tests for the app.component and the product.service.ts. It’s time to write a bit of code.
The Change
In the real world, most of the time we use data from APIs, and we must perform some actions:
- Add
provideHttpClientin theapp.config.ts. - Create a type for the
APIresponse. - Return the list of products from the API.
First, open the app.config.ts to provide the HttpClient.
import { ApplicationConfig } from '@angular/core';
import { provideRouter } from '@angular/router';

import { routes } from './app.routes';
import { provideHttpClient } from '@angular/common/http';

export const appConfig: ApplicationConfig = {
  providers: [
    provideRouter(routes),
  provideHttpClient()
  ]
};
Next, open the product.service.ts and define the Product type to return a strongly typed response.
export type Product = {
  id: string;
  title: string;
  image: string;
  price: string;
}
Add two private variables, the API and http, to store the injected HttpClient.
  private API = 'https://fakestoreapi.com/products'
  private http = inject(HttpClient)
Finally, expose a public property products$, returning an observable array of Products from an HTTP request.
public products$ = this.http.get<Product[]>(this.API);
The final code looks like this:
import {inject, Injectable} from '@angular/core';
import {HttpClient} from "@angular/common/http";

export type Product = {
  id: string;
  title: string;
  image: string;
  price: string;
}
@Injectable({
  providedIn: 'root'
})
export class ProductsService {
  private API = 'https://fakestoreapi.com/products'
  private http = inject(HttpClient)
  public products$ = this.http.get<Product[]>(this.API);

}
Perfect, let’s inject the productService into app.component.ts and expose a products$ observable.
Remember to import the
AsyncPipedirective to subscribe to the observable in the template and theCurrencyPipeto format the price.
import {Component, inject} from '@angular/core';
import { RouterOutlet } from '@angular/router';
import {ProductsService} from "./services/products.service";
import {AsyncPipe, CurrencyPipe} from "@angular/common";

@Component({
  selector: 'app-root',
  standalone: true,
  imports: [RouterOutlet, AsyncPipe, CurrencyPipe],
  templateUrl: './app.component.html',
  styleUrl: './app.component.scss'
})
export class AppComponent {
  public title = 'testing-in-angular';
  public products$ = inject(ProductsService).products$;

}
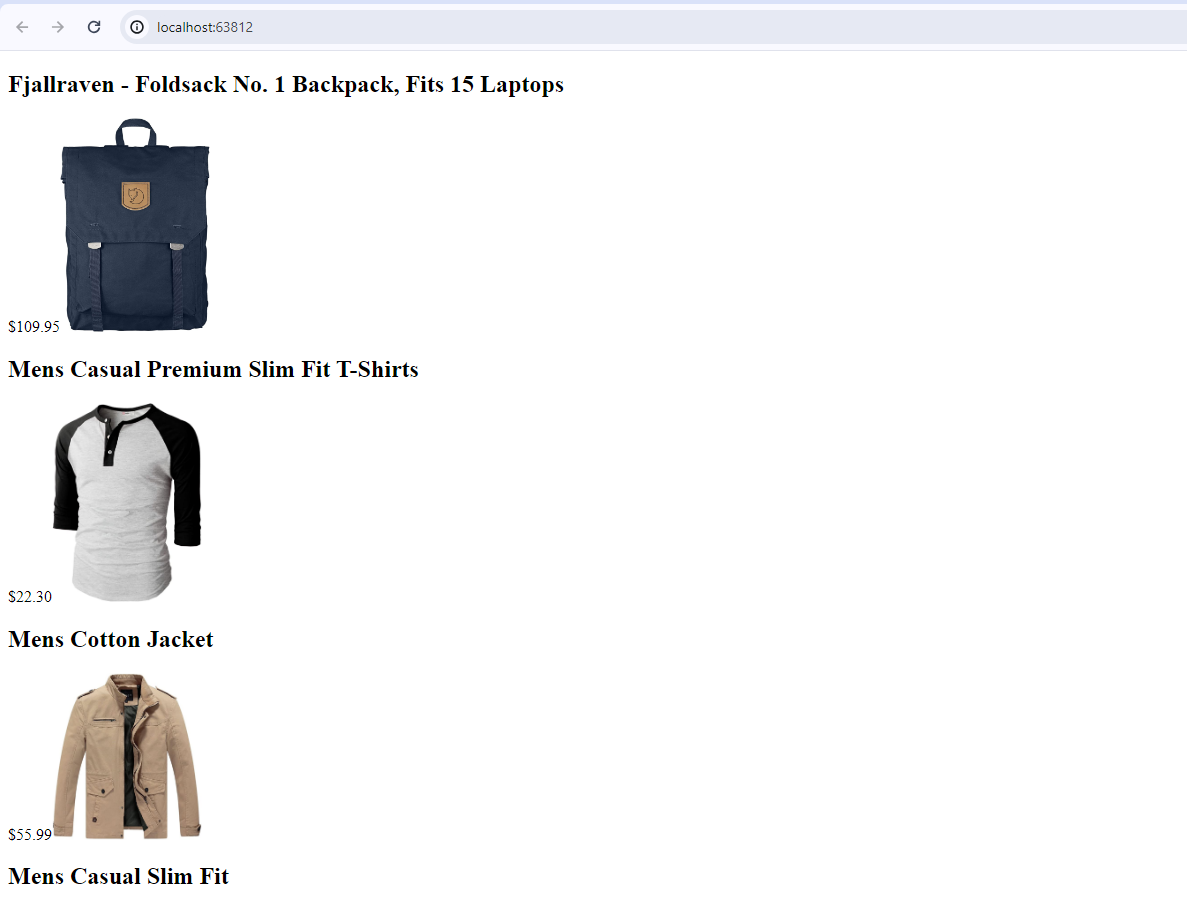
Finally, open the app.component.html and subscribe to the product using async pipe and iterate over the products using @for.
@if (products$ | async; as products) {
  @for(product of products; track  product) {
  <div>
    <h2>{{product.title}}</h2>
    <span>{{product.price}}</span>
    <img [src]="product.image" [width]="150">
  </div>
  }
}
Save changes and run the ng serve and everything seems to work! Yes!! 🎉
Let’s run our tests with ng test.
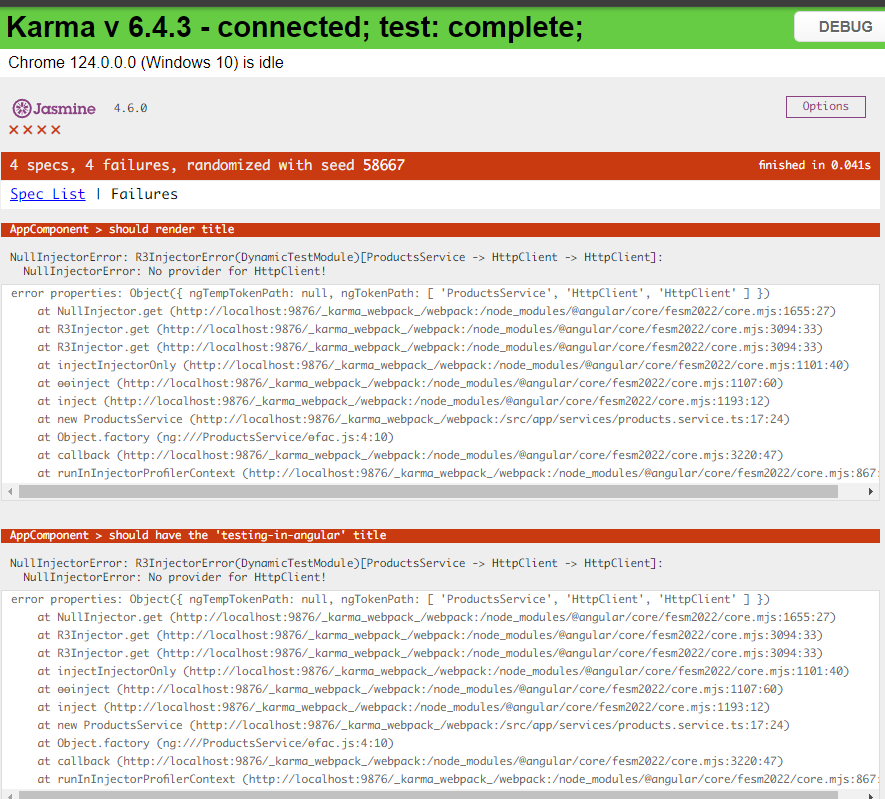
Oops! We have a problem! 😖 The tests are broken and we get weird errors like Injector, Providers, etc. Why did this happen if our tests were working before?
Well, we made changes. These tests were created based on the original code. Also, we added dependencies between our components, injected dependencies, so instead of using the generated tests, let’s write our own tests.
Writing Our First Component Test
After the app.component.spec.ts file, we found many things like describe, beforeEach, fixture, expect, TestBed, etc.
The best way to learn is by doing things ourselves, so I will remove all code in app.component.spec.ts and product.service.spec.ts files, and write each test.
How can we test a component? Unlike a service, which is a single class, the component is a TypeScript class that works together with an HTML template. Not to worry, Angular knows that and provides the TestBed to make testing components with templates easy.
Remember when I mentioned Angular uses Jasmine as a test framework? Let’s provide a basic overview.
Jasmine Basics
Jasmine is a testing framework that allows us to write tests easily, with a clear syntax. It comes with several functions to help us write tests and assert values.
The idea today is to learn six key elements of Jasmine; after that, you can survive with Jasmine or read more in the official documentation.
- describe: This function is used to group related tests together. We can describe a suite of tests for a particular component or feature.
- it: Define an individual test case. Each block describes a single behavior being tested and contains the actual test code.
- beforeEach: This function is executed before each test within a
describeblock, helping to set up the conditions that are common across several tests. - beforeAll: This function is executed once before all the tests in a
describeblock begin, performing setup tasks that need to happen only once before any of the tests run. - expect: This function is used to write test assertions. It takes a value, applies a matcher to it, and then checks whether the condition is true or not.
- matchers: These are methods that implement a boolean comparison between the actual value and the expected value. Jasmine includes a wide variety of matchers that allow you to validate different things, such as equality, truthiness or whether an array contains a particular item.
Read more about Jasmine.
Let’s practice some Jasmine basics. Create a new file named src/app/example.spec.ts, and use the describe function to define what we are going to test and declare a variable name with the value 'default'.
describe('example component', () => {
  let name = 'default'
})
The next step is to use the beforeEach lifecycle hook. In it, we are going to print the name value and reset the name value to 'default'.
describe('example component', () => {
  let name = 'default'

    beforeEach(() => {

    console.log(`my name: ${name}`);

    console.log('reset working to null');

    name = 'default';

  })

})
Now it’s time to use the it, expect, and matchers functions. We are going to write two tests to validate when the name is set to dany and mandy, that the name is equal to them.
Use the it function and expect to validate that the name has the value 'default' using the matcher toEqual. Next, set the name to 'dany' and validate it again. The code looks like this:
  it('should set dany name', () => {

     expect(name).toEqual('default');

     name = 'dany';

     expect(name).toEqual('dany')

   })
To finalize our tests, repeat the steps but change the description, set the name, and the expected value in the toEqual function to 'mandy'. The final code looks like this:
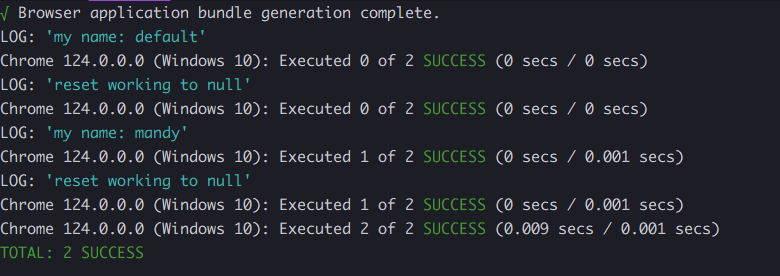
describe('app component', () => {

  let name = 'default'

  beforeEach(() => {
    console.log(`my name: ${name}`);
    console.log('reset working to null');
    name = 'default';
  })

  it('should set dany name', () => {
    expect(name).toEqual('default');
    name = 'dany';
    expect(name).toEqual('dany')
  })

  it('should set mandy name', () => {
    expect(name).toEqual('default');
    name = 'mandy';
    expect(name).toEqual('mandy')
  })

})
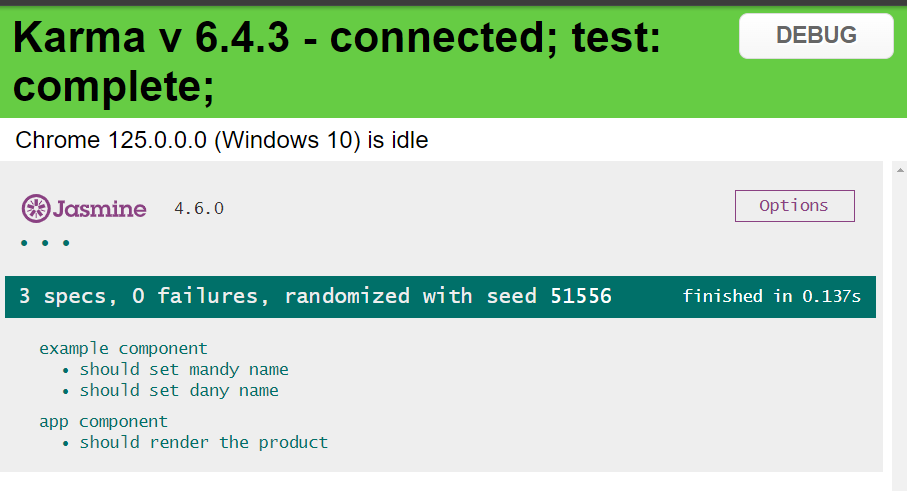
Run ng test again, and in the terminal you’ll see the logs and the browser should show the results:
Now ready with Jasmine, let’s move on to TestBed.
What Is TestBed ?
TestBed is an Angular testing class that makes it easy to configure and initialize the environment for unit tests in Angular. It acts as a sandbox where you can configure and set up the components, directives, services and pipes that are going to be tested.
TestBed makes it easy to create and work with Angular components and their dependencies in a testing scenario. By using TestBed, we can configure testing modules similar to how you would set up an Angular app with specified declarations, imports, providers and more. This helps in mocking or faking the runtime environment of an Angular application.
Also TestBed helps to create instances of components and resolve their required dependencies automatically through the Angular dependency injection system. This helps in testing components in isolation or in interaction with services or other components and helps to create instances of components and resolve their required dependencies automatically through the Angular dependency injection system.
Another great feature is that TestBed allows us to access the component instance for DOM manipulation or querying and triggering lifecycle events manually, which is essential for testing behaviors linked to these lifecycle events.
We have an overview of Jasmine and TestBed; let’s move on to writing our first test.
Read more about TestBed.
Jasmine and TestBed
We are going to write a test for app.component.ts. But before we start, the component has two dependencies:
- A list of products
- A service with the list of products
We don’t want to make a real HTTP call. We only want to test our component and be sure it works—we don’t care if the products come from API, local storage or wherever. So let’s create a mock example data.
Create a new file in tests/mock.ts; it contains the example mock data for our tests.
export const MOCK_PRODUCTS : Array<Product> = [
  {
    image: 'image.png',
    title: 'demo product',
    id: "3",
    price: "23"
  },
  {
    image: 'image2.png',
    title: 'Kendo Product',
    id: "4",
    price: "675"
  }
]
Next, open the app.component.spec.ts. Here is where we are going to write our own test. But before we proceed, let’s mock the ProductService. Create a dummy class to mock the ProductService; it will expose the same property products like the ProductService.
import {MOCK_PRODUCTS} from "./tests/mock";

export class MockProductService {
  public products$ = of(MOCK_PRODUCTS)
}
We have the mock data and mock service; it’s time to use TestBed and Jasmine along with describe and beforeEach lifecycle hooks.
😕 Hold on a second, but is
beforeEacha function and a lifecycle hook at the same time? ThebeforeEachfunction helps us run code at a specific point during the testing. It is a hook because it hooks into the lifecycle of test execution, allowing us to execute actions like resetting values before tests run, so that each test has the same configuration before starting.
Here, we are calling the describe function with the title as the first parameter and the arrow function as the second. Inside, using the ComponentFixture helper, create a new variable component.
describe('app component', () => {

  let component: ComponentFixture<AppComponent>

  beforeEach(() => {
  })
 })
Inside of the beforeEach, we configure the TestBed.configureTestingModule. It works similarly to the components or modules; we can use the providers to declare our components and services.
In the providers is an array; here we can add components and services. We can simply add AppComponent, but for the service, we must add it by passing an object where the provider is the ProductService but with the option useClass. So, instead of calling the original ProductService, useClass will use our MockProductService. After all the TestBed configuration, we must call the compileComponents method.
The TestBed is ready to use. Next, by using the method createComponent, assign the component variable using the TestBed.createComponent, passing the AppComponent as the type and as the parameter.
The code in our app.component.spec.ts should now look like:
 let component: ComponentFixture<AppComponent>

  beforeEach(() => {

    TestBed.configureTestingModule(
      {
        providers: [ AppComponent, {
          provide: ProductsService,
          useClass: MockProductService,
        }]
      }
    ).compileComponents()

    component = TestBed.createComponent<AppComponent>(AppComponent);

  })
OK, we set up the TestBed. Now it’s time to test our app, using it to trigger the Angular lifecycle hook to start the subscription to the service and get the products.
Using the component.nativeElement, we can query the HTML DOM to get data from the template—for example, the product title—and store it in a variable.
Finally, using a matcher, validate that the title is equal to the first element in the MOCK_PRODUCTS.
  it('should render the product', () => {
    component.detectChanges();
    const productTitle: HTMLElement = component.nativeElement.querySelector('h2');
    expect(productTitle.innerText).toEqual(MOCK_PRODUCTS[0].title)
  })
The final code looks like this.
import {
  ComponentFixture,
  TestBed
} from "@angular/core/testing";
import {AppComponent} from "./app.component";
import { ProductsService} from "./services/products.service";
import {of} from "rxjs";
import {MOCK_PRODUCTS} from "./tests/mock";

export class MockProductService {
  public products$ = of(MOCK_PRODUCTS)
}

describe('app component', () => {

  let component: ComponentFixture<AppComponent>

  beforeEach(() => {

    TestBed.configureTestingModule(
      {
        providers: [ AppComponent, {
          provide: ProductsService,
          useClass: MockProductService,
        }]
      }
    ).compileComponents()

    component = TestBed.createComponent<AppComponent>(AppComponent);

  })

  it('should render the product', () => {
    component.detectChanges();
    const productTitle: HTMLElement = component.nativeElement.querySelector('h2');
    expect(productTitle.innerText).toEqual(MOCK_PRODUCTS[0].title)
  })

})
Save the changes, and the test is green again!
OK, it’s our first test, validating when we get the data, it renders the title. You can feel free to query if other elements were rendered, but we don’t want to write a book, and the manager expects us to deliver our test with a test runner.
Moving to Web Test Runner
We have our test running with Jasmine and Karma, but it’s time to say goodbye to Karma and love Web Test Runner.
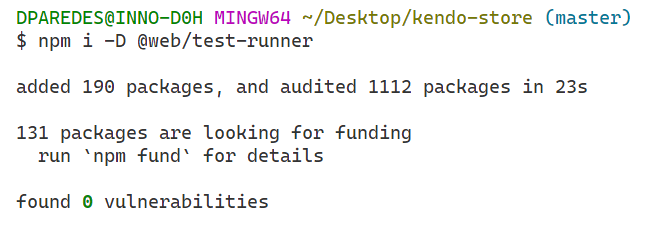
First, install the @web/test-runner package from the terminal.
npm i -D @web/test-runner
Next, open the angular.json file to change the builder to web-test-runner in the test section.
  "test": {
          "builder": "@angular-devkit/build-angular:web-test-runner",
Because Web Test Runner doesn’t allow empty files, we should write a test for
product.service.spec.ts. However, I think this is a special case to cover in the next article, so let’s openproduct.service.spec.tsand add the following nice code.
describe('ProductsService', () => {
  it('should be create in next article 🤣', () => {
    expect(true).toBeTruthy();
  });
});
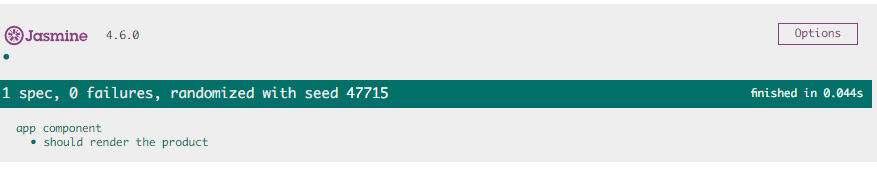
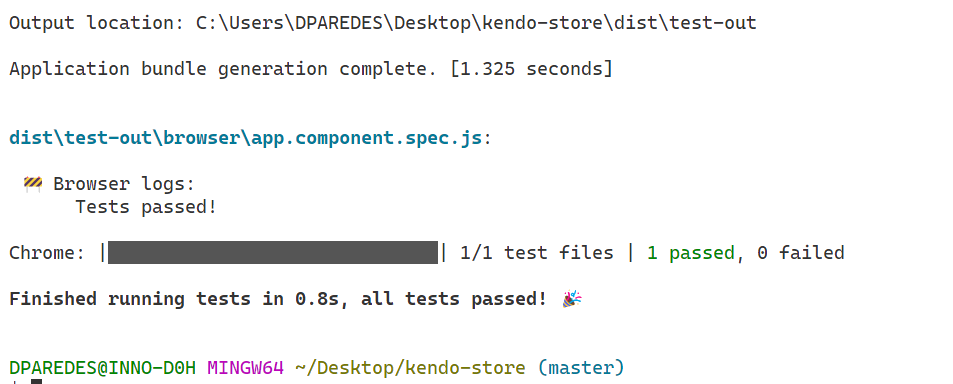
Save changes, and run your tests with npm run test, and you will see your tests running using Jasmine and Web Test Runner! 🎉
What’s Next?
Well, it was a nice journey learning about the status of testing in Angular, also Jasmine, TestBed, and how to test our components, fake dependencies, and also move from Karma to Web Test Runner—a lot of concepts!
Of course, testing a component is not the same as testing a service, but we did our first step. In the next article, we’re going to learn how to test our service, mock the HTTP request to avoid real requests and more!
Happy testing!!!

Dany Paredes
Dany Paredes is a Google Developer Expert on Angular and Progress Champion. He loves sharing content and writing articles about Angular, TypeScript and testing on his blog and on Twitter (@danywalls).
Related Posts
Comments
All articles
Topics

Latest Stories
in Your Inbox
Subscribe to be the first to get our expert-written articles and tutorials for developers!
All fields are required